When you create a Database Deployment in Oracle Database Cloud Service, the following tasks are completed for you:
In this article we will demonstrate how to connect to Compute Node using VNC.
Prerequisites
Steps to connect to Oracle Database Cloud Compute Node using VNC on Windows Operating System
Open PuTTY session on your desktop and enter Compute Node IP address


Follow the procedure below to configure custom Security List and Rules to enable access to specific security applications (VNC application and port range 5901 - 5905) on the compute node.


Status: Enabled to enable the rule
Security Application: we create above
Source: Security IP List -> public-internet
Destination: select security list created above from drop down
Click Create


Enjoy working with Compute Node in GUI mode...
Conclusion
In this article we have learned how to connect to Oracle Cloud Compute Node using VNC in GUI Mode. To accomplish this we need to install Operating System packages and create custom Security List and Rules to enable access to specific security applications (VNC application and port range 5901 - to 5905) on the compute node. Oracle Compute Cloud Service networking create resources to provide network access to the compute node.
- Compute Node Allocated
- Storage Allocated
- Virtual Machine Image Installed
- Set Keys and Privileges
- Install and Configure Database
- Configure Backup
- Configure Tools
- Configure Access
Network access to the Compute Node associated with Oracle Database Cloud Service is primarily provided by SSH connections on port 22. By default SSH port 22 is opened to allow access to the tools, utilities and other resources on the Compute Node associated with the Oracle Database Cloud Services. You can use SSH client software such as PuTTY on Windows to establish a secure connection and log in as "opc" or "oracle" user. You can also connect to Compute node using GUI interface, for this you can use VNC.
In this article we will demonstrate how to connect to Compute Node using VNC.
Prerequisites
- IP address of Compute Node
- TigerVNC Viewer client software
- TigerVNC Server package installed on Compute Node
- Login to the Oracle Cloud Compute Node
Open PuTTY session on your desktop and enter Compute Node IP address

- On the left pane, expand "SSH" and select "Auth". On the right pane, click on "Browse" button. Select the Private Key that matches the Public Key for your Deployment. Click "Open"

- Enter login as "opc". This will connect you to the compute node without password

- Switch to root by executing "sudo -s" command. Confirm that you are switched to root by executing "id" command

- Verify your Operating System version. Here the OS is OEL and version is 6 with update 8

- Navigate to the yum repository directory and open the public yum repository file

- In the file look for your operating system version, example ol6_latest and make sure "enabled=1" is set

- Next look for operating system base update, example ol6_u8_base and make sure "enabled=1" is set

- Verify the file is updated successfully
- Install the Tigervnc* package using the yum utility

- Type y and hit return

- We can see that the package installation completed successfully

- Verify that the package is installed using rpm -qa command

- Verify if vnc server is running or not as root and oracle user. We can see that vnc server is not running

- Let's start the vnc server as oracle users. Enter a password of your choice and verify. From the 'ps -ef|grep vnc' command output note down the port numbers :1 and 5901

- Open Tiger VNC Viewer on your desktop/laptop and enter the port :1

- Connection failed.... This is because the port 5901 is not opened on the Compute Node. We should open the port 5901 and try again

Follow the procedure below to configure custom Security List and Rules to enable access to specific security applications (VNC application and port range 5901 - 5905) on the compute node.
- Open a web browser and enter the URL you received in the Welcome email to login to Oracle Cloud Account
- Enter your username and password

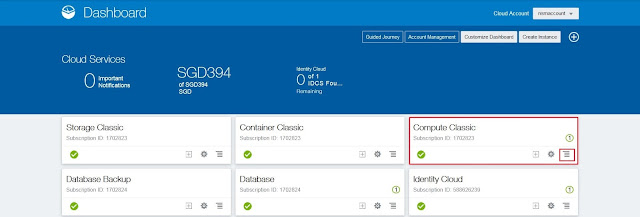
- On the home page, Click "Menu" under "Compute Classic" Cloud Service as shown below

- Click "Open Service Console"

- Click on "Network"

- Expand "Shared Network"

- Click "Security Applications" and then "Create Security Application"

- Enter a Security Application Name, Port Type, Port Range Start, Port Range End and a Description and click Create. In our scenario we are enabling access to VNC application on the ports between 5901 and 5905

- Make sure the Security Application is created by searching it

- Click "Security Lists" and then "Create Security List"

- Enter Security List Name and leave Inbound Policy and Outbound Policy to DEFAULT value and click Create

- Make sure the Security List is created by searching it

- Click "Security Rules" and then "Create Security Rule"

- Enter the details as show below:
Status: Enabled to enable the rule
Security Application: we create above
Source: Security IP List -> public-internet
Destination: select security list created above from drop down
Click Create

- Make sure the Security Rule is created by searching it

- Click "Instances"
- Select your Instance and scroll down

- Click "Add Security List"

- Select "Security List" create above from the drop down list

- Make sure the Security List added to your Instance

- Open VNC on your desktop/Laptop and enter the IP address of your Database Deployment

- Enter VNC password used at the time of starting VNC server software on the compute node

- Enter Oracle user password given at the time of configuring VNC Server to connect to the Compute node

- We are now connected to the compute node in GUI interface using VNC

Enjoy working with Compute Node in GUI mode...
Conclusion
In this article we have learned how to connect to Oracle Cloud Compute Node using VNC in GUI Mode. To accomplish this we need to install Operating System packages and create custom Security List and Rules to enable access to specific security applications (VNC application and port range 5901 - to 5905) on the compute node. Oracle Compute Cloud Service networking create resources to provide network access to the compute node.


