Friday 26 April 2019

Deploy Exadata Database Machine On Oracle Cloud Infrastructure

In this article we will demonstrate a quick steps to deploy Exadata Database Machine in Oracle Cloud Infrastructure (OCI).

Prerequisites:
  • Exadata Cloud Subscription
  • Credentials to Login Oracle Cloud
  • Access to Deploy Exadata in OCI
  • Compartment
  • VCN & Subnet

Steps to Deploy Exadata on OCI

  • Open a browser and enter the URL you have received from Oracle to connect to the Oracle Cloud

  • Enter your Oracle Cloud credentials

  • Click on "Create Instance"

  • Click on "All Services" and search for Exadata keyword. Click on Create.

  • Select your "Compartment" on left and Click on "Launch DB System"

  • Enter the details as per your requirement and the Exadata subscription procured


  • Browse and upload the public key

  • Choose your desired storage allocation and timezone

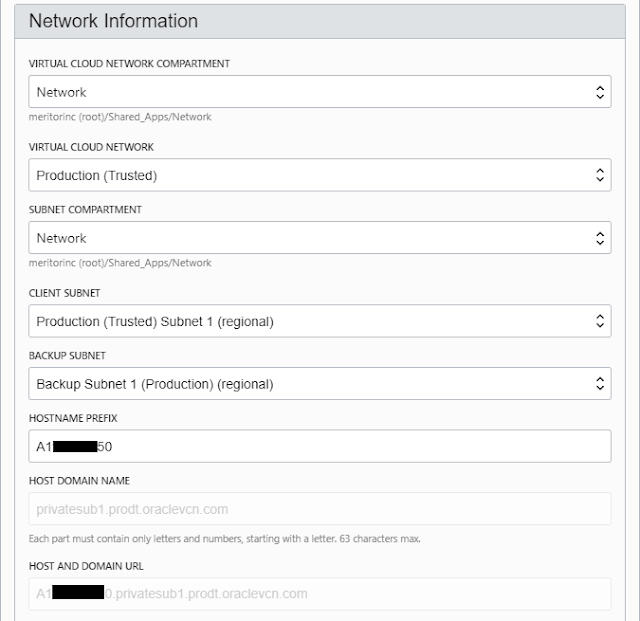
  • Fill in the required VCN and Subnet details. Work with your network engineer to gather the correct details on VCN and Subnet created for your environment

  • Fill the database details, name, version, CDB and Password

  • Select the Workload type and database character set for your database

  • Optionally specify the TAG Key and click "Launch DB System" to deploy Exadata DBM


Conclusion

In this article we have learned how to deploy an Exadata Database Machine in Oracle Cloud Infrastructure (OCI).


Friday 5 April 2019

Exadata Hardware Generation At a Glance (V1 to X8)


An engineered system comprising of Compute Nodes, Storage Cells and Infiniband  – all of it packaged inside a single physical cabinet called “Exadata Rack”


Exadata Hardware Generation At A Glance


Exadata Database Machine X8-2


Wednesday 3 April 2019

Exadata Database Machine X8-2 - First look

Oracle announced the next-generation Oracle Exadata X8 with significant hardware and software enhancements in overall performance, storage capacity, network bandwidth, and automation. Exadata X7 delivers extreme performance and reliability to run the largest, most business-critical database workloads.

Exadata X8-2 quick glance:

  • Latest Intel Xeon (8260) Processors (2.4GHz) 2*24 cores per database server (384 core in a Full Rack)
  • Exadata X8 Capacity-on-Demand enables at least 14 cores per server
  • Delivers up to 60 percent faster throughput than previous models
  • NO changes in Database server Physical memory (upto 12TB in a full Rack)
  • Latest Intel Xeon (5218) Processors (2.3GHz) 2*16 cores per Storage server (448 core in a Full Rack)
  • NO increase in the capacity of Extreme Flash storage (716.8TB in a full Rack)
  • 40% increase in disk capacity (2352TB in a full Rack)
  • Exadata X8 introduces new Exadata storage option - Extended (XT) Storage Server
  • Each Exadata XT Storage Server includes twelve 14 TB SAS disk drives
  • A full rack Exadata X8-2 system has:
    • Raw capacity of 2.3 petabytes of disk storage & 358.4TB Flash
    • 720 terabytes of NVMe all-Flash storage
    • Raw capacity of 2.3 petabytes of disk storage & No flash
  • Additional network 2x 10/25 Gb optical Ethernet (client – optional)
  • Available in Oracle Public Cloud - Oracle Database Exadata Cloud Service


https://www.oracle.com/a/ocom/docs/engineered-systems/exadata/exadata-x8-2-ds.pdf
 

https://www.oracle.com/a/ocom/docs/engineered-systems/exadata/exadata-x8-8-ds.pdf


Tuesday 2 April 2019

Dbvisit Standby Architecture and Components

Before we talk about Dbvisit Standby and it's components, let's talk little bit about about Disaster Recovery and Business Continuity.


What is Business Continuity?

In the event of a disaster, the process of failing over your server from the primary to the secondary site is known as Disaster Recovery. A disaster recovery solution provides your Company with Business Continuity.

The main purpose of Dbvisit Standby is to provide the Organizations with greater Business continuity.


What is Physical Replication?

The process of creating a Standby database from the source or primary database is known as Physical Replication. The Standby database is kept in sync using the archive logs generated on the source database to ensure that the Standby database is an exact copy of the source database.


How to Configure Disaster Recovery environment with Dbvisit Standby?

The following are the Disaster Recovery Configurations options available:
  1. On-Premise to On-Premise
  2. On-Premise to Cloud
  3. Cloud to On-Premise
  4. Cloud to Cloud

Dbvisit Standby Architecture

These are four main components that make up Dbvisit Standby’s Architecture.
  • Dbvserver
  • Dbvagent
  • Dbvnet
  • Standby core


Dbvserver:

It hosts secure web based user interface for Dbvisit standby. Multiple users can manage various different DR configurations. It provide graphical overview of setup, running and reporting of DR sites. It is recommended to that Dbvserver which has a small footprint be installed on different server.

Dbvserver details:
Using a small VM machine should be sufficient
HTTPS protocol port 4433
Host Managed by Dbvserver can be Windows or Linux
It has a small repository where information about executed tasks are store
It support Chrome, FireFox and Safari browsers

Dbvagent:

It is used to manages the communication between Dbvserver (web based user interface) and Dbvisit Standby core. Communication between Dbvagent and Dbvserver is encrypted. Dbvisit agent has a small footprint and listens for secure connection on port 7891 from the central console. The Dbvisit agent must run on the host managed by the Dbvisit Standby Central console. A user can bypass Dbvserver web based user interface and directly access CLI if preferred. In this case Dbvisit agent does not have to be installed or can be left shutdown.

Dbvnet:

It is responsible for secure communication between primary and standby systems. It essentially provides an encrypted transport layer to copy files and execute remote commands between primary and standby database server. It runs on both primary and standby servers and configured during installation process. Dbvnet removes any dependency SSH had for providing network communication  between primary and standby nodes. It is started as background process and it runs independently from the Dbvserver and Dbvagent.

Dbvisit Standby Core:

It is also known as command line interface. It is the heart of Dbvisit standby. This is where all commands are run to enable Dbvisit Standby to function. A user can bypass Dbvserver web based user interface and directly access CLI if preferred.

Dbvisit Standby Core allow you:

  •     Create standby database (CSD)
  •     Extract and Send archive logs to standby (SEND)
  •     Recover standby database using shipped archived logs (RECOVER)
  •     Perform Graceful Switchover also known as role reversal (GS)
  •     Synchronize a standby database (SYNC)
  •     In case of disaster activate the standby database (FAILVOER)
  •     It also provide API options, more than 80 command line API options (API)

dbvctl : The Dbvisit Standby Control CLI Utility


Other Dbvisit Standby Components

  • Database Configuration File (DDC)
Contains the Dbvisit Standby setting for a specific primary and standby pair.
Generated during the setup for each database.
can be edited with any text editor or by running 'dbvisit -o setup' or through web based GUI

  • Database Repository (DDR)
This is repository used by Dbvisit Standby to store internal information about Dbvisit Standby Configuration and functionality being performed.
It is a small *.db file located in the standby/conf sub directory.

  • Trace Files
Contains information about Dbvisit standby processing.
These files are required by Dbvisit Support in the event when an error is raised.
They are located in the standby/trace sub directory.


Dbvisit Standby functionality

Dbvisit Standby follows a simple 3 Steps functionality. The same is illustrated in the picture below:

Step 1: Log Extraction : Dbvisit Standby will extract the primary database archive logs from the database archive destination.
Step 2: Transport : The second step in the process will be to copy these extracted archive logs to the standby site.
Step 3: Log Apply : The third step in the process is Dbvisit Standby applying the transferred archive logs to the standby database.


Dbvisit Standby on Oracle RAC

  • Dbvisit Standby can be used together with Oracle RAC (Real Application Cluster)
  • Oracle RAC together with Dbvisit Standby standby database(s) allows scalability and provides high availability and disaster recovery
  • Dbvisit Standby supports archive logs in Oracle ASM (Automatic Storage Management) file system
  • The standby database can be a RAC or Non-RAC standby database


Conclusion

In this article we have learned Dbvisit Standby Architecture, different Dbvisit Standby components and Dbvisit Standby functionality.


Comparing Oracle Database Appliance X8-2 Model Family

September 2019 Oracle announced Oracle Database Appliance X8-2 (Small, Medium and HA). ODA X8-2 comes with more computing resources com...