Showing posts with label Exadata. Show all posts

Tuesday, 25 June 2019

Step By Step Exadata Storage Cell Rescue Process


You will be ended up performing storage cell rescue under the following situations:
  • Improper Battery Replacement
  • Improper Card Seating
  • Card Damage During Battery Replacement
  • Corrupted Root File System

In this article we will demonstrate step by step process to Rescue an Exadata Storage Cell or server.

Open a browser and enter the ILOM hostname or IP address of the Storage cell you want to rescue
https://dm01cel02-ilom.netsoftmate.com

Enter root crendentials

On the left pane under "Remote Control", click "Redirection". Select "Use video redirection" and click "Launch Remote Console" button

Click OK

 Click OK

Click Continue

Click Run

Click Continue (not recommended)

From the ILOM video console we can see that the root file system can't be mounted due to corruption and it will be rebooted again in 60 seconds

On the left pane under "Host Management" click on "Power Control". From the drop down list Select "Power Cycle"

Click Save

Click OK

Rebooting in progress

Server is no rebooting

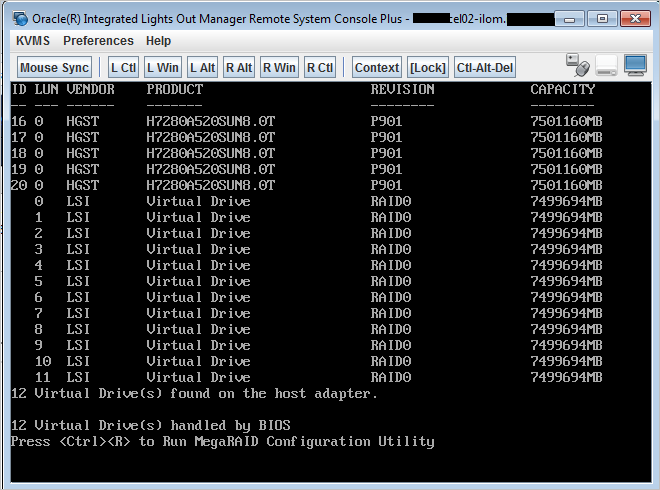
Immediately press Ctrl+S on keyboard 

Select the "CELL_USB_BOOT_CELLBOOT_usb_in_rescue_mode

At the point, we will have continue the rescue process using serial ILOM

As root, ssh to the storage cell ILOM and start the serial console

Enter r and hit return

Enter y and hit return

Enter the rescue password sos1exadata. Enter n and hit return

Enter the root user password 

We are into the rescue mode. At this moment check to make sure that the there are no file system issue. Fix any other issue you may have. Consult Oracle if required

Reboot the server again to complete the rescue process

Hit return

The server is powered off

Power on the server using web ILOM as shown below

Rescue process is completed and we got the root login prompt


Login to the server as root user and perform the post rescue steps
  
Verify the image version of the storage cell


Post Storage Cell Rescue steps:

[root@dm01cel02 ~]# imageinfo

Kernel version: 4.1.12-94.8.4.el6uek.x86_64 #2 SMP Sat May 5 16:14:51 PDT 2018 x86_64
Cell version: OSS_18.1.7.0.0AUG_LINUX.X64_180821
Cell rpm version: cell-18.1.7.0.0_LINUX.X64_180821-1.x86_64

Active image version: 18.1.7.0.0.180821
Active image kernel version: 4.1.12-94.8.4.el6uek
Active image activated: 2019-03-17 03:27:41 -0500
Active image status: success
Active system partition on device: /dev/md5
Active software partition on device: /dev/md7

Cell boot usb partition: /dev/sdm1
Cell boot usb version: 18.1.7.0.0.180821

Inactive image version: undefined
Rollback to the inactive partitions: Impossible


CellCLI> import celldisk all force
No cell disks qualified for this import operation

CellCLI> list physicaldisk
         12:0            PST0XV          normal
         12:1            PZNDSV          normal
         12:2            PT5Z4V          normal
         12:3            PU3XLV          normal
         12:4            PYAKLV          normal
         12:5            PV828V          normal
         12:6            PZE5NV          normal
         12:7            PYV0YV          normal
         12:8            PZKUXV          normal
         12:9            PYD86V          normal
         12:10           PZL15V          normal
         12:11           PZPLAV          normal
         FLASH_1_1       S2T7NCAHA00958  normal
         FLASH_2_1       S2T7NCAHA00986  normal
         FLASH_4_1       S2T7NCAHA00956  normal
         FLASH_5_1       S2T7NCAHA00947  normal

CellCLI> list celldisk
         CD_00_dm01cel02        normal
         CD_01_dm01cel02        normal
         CD_02_dm01cel02        normal
         CD_03_dm01cel02        normal
         CD_04_dm01cel02        normal
         CD_05_dm01cel02        normal
         CD_06_dm01cel02        normal
         CD_07_dm01cel02        normal
         CD_08_dm01cel02        normal
         CD_09_dm01cel02        normal
         CD_10_dm01cel02        normal
         CD_11_dm01cel02        normal
         FD_00_dm01cel02        normal
         FD_01_dm01cel02        normal
         FD_02_dm01cel02        normal
         FD_03_dm01cel02        normal

CellCLI> list griddisk
         DATA_DM01_CD_00_dm01cel02     active
         DATA_DM01_CD_01_dm01cel02     active
         DATA_DM01_CD_02_dm01cel02     active
         DATA_DM01_CD_03_dm01cel02     active
         DATA_DM01_CD_04_dm01cel02     active
         DATA_DM01_CD_05_dm01cel02     active
         DATA_DM01_CD_06_dm01cel02     active
         DATA_DM01_CD_07_dm01cel02     active
         DATA_DM01_CD_08_dm01cel02     active
         DATA_DM01_CD_09_dm01cel02     active
         DATA_DM01_CD_10_dm01cel02     active
         DATA_DM01_CD_11_dm01cel02     active
         DBFS_DG_CD_02_dm01cel02       active
         DBFS_DG_CD_03_dm01cel02       active
         DBFS_DG_CD_04_dm01cel02       active
         DBFS_DG_CD_05_dm01cel02       active
         DBFS_DG_CD_06_dm01cel02       active
         DBFS_DG_CD_07_dm01cel02       active
         DBFS_DG_CD_08_dm01cel02       active
         DBFS_DG_CD_09_dm01cel02       active
         DBFS_DG_CD_10_dm01cel02       active
         DBFS_DG_CD_11_dm01cel02       active
         RECO_DM01_CD_00_dm01cel02     active
         RECO_DM01_CD_01_dm01cel02     active
         RECO_DM01_CD_02_dm01cel02     active
         RECO_DM01_CD_03_dm01cel02     active
         RECO_DM01_CD_04_dm01cel02     active
         RECO_DM01_CD_05_dm01cel02     active
         RECO_DM01_CD_06_dm01cel02     active
         RECO_DM01_CD_07_dm01cel02     active
         RECO_DM01_CD_08_dm01cel02     active
         RECO_DM01_CD_09_dm01cel02     active
         RECO_DM01_CD_10_dm01cel02     active
         RECO_DM01_CD_11_dm01cel02     active


[root@dm01cel02 ~]# cellcli -e list flashcache detail
         name:                   dm01cel02_FLASHCACHE
         cellDisk:               FD_03_dm01cel02,FD_01_dm01cel02,FD_02_dm01cel02,FD_00_dm01cel02
         creationTime:           2019-03-17T03:19:43-05:00
         degradedCelldisks:
         effectiveCacheSize:     11.64312744140625T
         id:                     574c3bd1-7a35-42ba-a03b-75f3a93edac7
         size:                   11.64312744140625T
         status:                 normal

[root@dm01cel02 ~]# cellcli -e list flashlog detail
         name:                   dm01cel02_FLASHLOG
         cellDisk:               FD_03_dm01cel02,FD_00_dm01cel02,FD_01_dm01cel02,FD_02_dm01cel02
         creationTime:           2019-03-17T03:19:43-05:00
         degradedCelldisks:
         effectiveSize:          512M
         efficiency:             100.0
         id:                     73cd8288-c6d8-42c3-95a1-97ce287cf7d0
         size:                   512M
         status:                 normal

SQL> select a.name,b.path,b.state,b.mode_status,b.failgroup
    from v$asm_diskgroup a, v$asm_disk b
    where a.group_number=b.group_number
    and b.failgroup='dm01cel02'
    order by 2,1;

no rows selected


SQL> alter diskgroup DBFS_DG add disk 'o/192.168.1.1;192.168.1.2/DBFS_DG_*_dm01cel02' force;

Diskgroup altered.

 
SQL> alter diskgroup DATA_DM01 add disk 'o/192.168.1.1;192.168.1.2/DATA_DM01_*_dm01cel02' force;

Diskgroup altered.

 
SQL> alter diskgroup RECO_DM01 add disk 'o/192.168.1.1;192.168.1.2/RECO_DM01_*_dm01cel02' force;

Diskgroup altered.

 
SQL> select * from v$asm_operation;

GROUP_NUMBER OPERA STAT      POWER     ACTUAL      SOFAR   EST_WORK   EST_RATE EST_MINUTES ERROR_CODE
------------ ----- ---- ---------- ---------- ---------- ---------- ---------- ----------- --------------------------------------------
           1 REBAL RUN           4          4     204367    3521267      13041         254
           3 REBAL WAIT          4


SQL> select * from v$asm_operation;

no rows selected


SQL> col path for a70
SQL> set lines 200
SQL> set pages 200
SQL> select a.name,b.path,b.state,b.mode_status,b.failgroup
    from v$asm_diskgroup a, v$asm_disk b
    where a.group_number=b.group_number
    and b.failgroup='dm01cel02'
    order by 2,1;  2    3    4    5

NAME                           PATH                                                                   STATE    MODE_ST FAILGROUP
------------------------------ ---------------------------------------------------------------------- -------- ------- ------------------------------
DATA_DM01                     o/192.168.1.1;192.168.1.2/DATA_DM01_CD_00_dm01cel02              NORMAL   ONLINE  dm01cel02
DATA_DM01                     o/192.168.1.1;192.168.1.2/DATA_DM01_CD_01_dm01cel02              NORMAL   ONLINE  dm01cel02
DATA_DM01                     o/192.168.1.1;192.168.1.2/DATA_DM01_CD_02_dm01cel02              NORMAL   ONLINE  dm01cel02
DATA_DM01                     o/192.168.1.1;192.168.1.2/DATA_DM01_CD_03_dm01cel02              NORMAL   ONLINE  dm01cel02
DATA_DM01                     o/192.168.1.1;192.168.1.2/DATA_DM01_CD_04_dm01cel02              NORMAL   ONLINE  dm01cel02
DATA_DM01                     o/192.168.1.1;192.168.1.2/DATA_DM01_CD_05_dm01cel02              NORMAL   ONLINE  dm01cel02
DATA_DM01                     o/192.168.1.1;192.168.1.2/DATA_DM01_CD_06_dm01cel02              NORMAL   ONLINE  dm01cel02
DATA_DM01                     o/192.168.1.1;192.168.1.2/DATA_DM01_CD_07_dm01cel02              NORMAL   ONLINE  dm01cel02
DATA_DM01                     o/192.168.1.1;192.168.1.2/DATA_DM01_CD_08_dm01cel02              NORMAL   ONLINE  dm01cel02
DATA_DM01                     o/192.168.1.1;192.168.1.2/DATA_DM01_CD_09_dm01cel02              NORMAL   ONLINE  dm01cel02
DATA_DM01                     o/192.168.1.1;192.168.1.2/DATA_DM01_CD_10_dm01cel02              NORMAL   ONLINE  dm01cel02
DATA_DM01                     o/192.168.1.1;192.168.1.2/DATA_DM01_CD_11_dm01cel02              NORMAL   ONLINE  dm01cel02
DBFS_DG                        o/192.168.1.1;192.168.1.2/DBFS_DG_CD_02_dm01cel02                 NORMAL   ONLINE  dm01cel02
DBFS_DG                        o/192.168.1.1;192.168.1.2/DBFS_DG_CD_03_dm01cel02                 NORMAL   ONLINE  dm01cel02
DBFS_DG                        o/192.168.1.1;192.168.1.2/DBFS_DG_CD_04_dm01cel02                 NORMAL   ONLINE  dm01cel02
DBFS_DG                        o/192.168.1.1;192.168.1.2/DBFS_DG_CD_05_dm01cel02                 NORMAL   ONLINE  dm01cel02
DBFS_DG                        o/192.168.1.1;192.168.1.2/DBFS_DG_CD_06_dm01cel02                 NORMAL   ONLINE  dm01cel02
DBFS_DG                        o/192.168.1.1;192.168.1.2/DBFS_DG_CD_07_dm01cel02                 NORMAL   ONLINE  dm01cel02
DBFS_DG                        o/192.168.1.1;192.168.1.2/DBFS_DG_CD_08_dm01cel02                 NORMAL   ONLINE  dm01cel02
DBFS_DG                        o/192.168.1.1;192.168.1.2/DBFS_DG_CD_09_dm01cel02                 NORMAL   ONLINE  dm01cel02
DBFS_DG                        o/192.168.1.1;192.168.1.2/DBFS_DG_CD_10_dm01cel02                 NORMAL   ONLINE  dm01cel02
DBFS_DG                        o/192.168.1.1;192.168.1.2/DBFS_DG_CD_11_dm01cel02                 NORMAL   ONLINE  dm01cel02
RECO_DM01                     o/192.168.1.1;192.168.1.2/RECO_DM01_CD_00_dm01cel02              NORMAL   ONLINE  dm01cel02
RECO_DM01                     o/192.168.1.1;192.168.1.2/RECO_DM01_CD_01_dm01cel02              NORMAL   ONLINE  dm01cel02
RECO_DM01                     o/192.168.1.1;192.168.1.2/RECO_DM01_CD_02_dm01cel02              NORMAL   ONLINE  dm01cel02
RECO_DM01                     o/192.168.1.1;192.168.1.2/RECO_DM01_CD_03_dm01cel02              NORMAL   ONLINE  dm01cel02
RECO_DM01                     o/192.168.1.1;192.168.1.2/RECO_DM01_CD_04_dm01cel02              NORMAL   ONLINE  dm01cel02
RECO_DM01                     o/192.168.1.1;192.168.1.2/RECO_DM01_CD_05_dm01cel02              NORMAL   ONLINE  dm01cel02
RECO_DM01                     o/192.168.1.1;192.168.1.2/RECO_DM01_CD_06_dm01cel02              NORMAL   ONLINE  dm01cel02
RECO_DM01                     o/192.168.1.1;192.168.1.2/RECO_DM01_CD_07_dm01cel02              NORMAL   ONLINE  dm01cel02
RECO_DM01                     o/192.168.1.1;192.168.1.2/RECO_DM01_CD_08_dm01cel02              NORMAL   ONLINE  dm01cel02
RECO_DM01                     o/192.168.1.1;192.168.1.2/RECO_DM01_CD_09_dm01cel02              NORMAL   ONLINE  dm01cel02
RECO_DM01                     o/192.168.1.1;192.168.1.2/RECO_DM01_CD_10_dm01cel02              NORMAL   ONLINE  dm01cel02
RECO_DM01                     o/192.168.1.1;192.168.1.2/RECO_DM01_CD_11_dm01cel02              NORMAL   ONLINE  dm01cel02

34 rows selected.


Conclusion

In this article we have demonstrated step by step procedure to perform Storage Cell Rescue. You may have to perform the Storage cell rescue for multiple reasons such as root file system corrupted, Kernel panic, server rebooting continuously and so on. With the help of CELLBOOT usb one can perform the storage cell rescue very easily.

Friday, 26 April 2019

Deploy Exadata Database Machine On Oracle Cloud Infrastructure

In this article we will demonstrate a quick steps to deploy Exadata Database Machine in Oracle Cloud Infrastructure (OCI).

Prerequisites:
  • Exadata Cloud Subscription
  • Credentials to Login Oracle Cloud
  • Access to Deploy Exadata in OCI
  • Compartment
  • VCN & Subnet

Steps to Deploy Exadata on OCI

  • Open a browser and enter the URL you have received from Oracle to connect to the Oracle Cloud

  • Enter your Oracle Cloud credentials

  • Click on "Create Instance"

  • Click on "All Services" and search for Exadata keyword. Click on Create.

  • Select your "Compartment" on left and Click on "Launch DB System"

  • Enter the details as per your requirement and the Exadata subscription procured


  • Browse and upload the public key

  • Choose your desired storage allocation and timezone

  • Fill in the required VCN and Subnet details. Work with your network engineer to gather the correct details on VCN and Subnet created for your environment

  • Fill the database details, name, version, CDB and Password

  • Select the Workload type and database character set for your database

  • Optionally specify the TAG Key and click "Launch DB System" to deploy Exadata DBM


Conclusion

In this article we have learned how to deploy an Exadata Database Machine in Oracle Cloud Infrastructure (OCI).


Friday, 5 April 2019

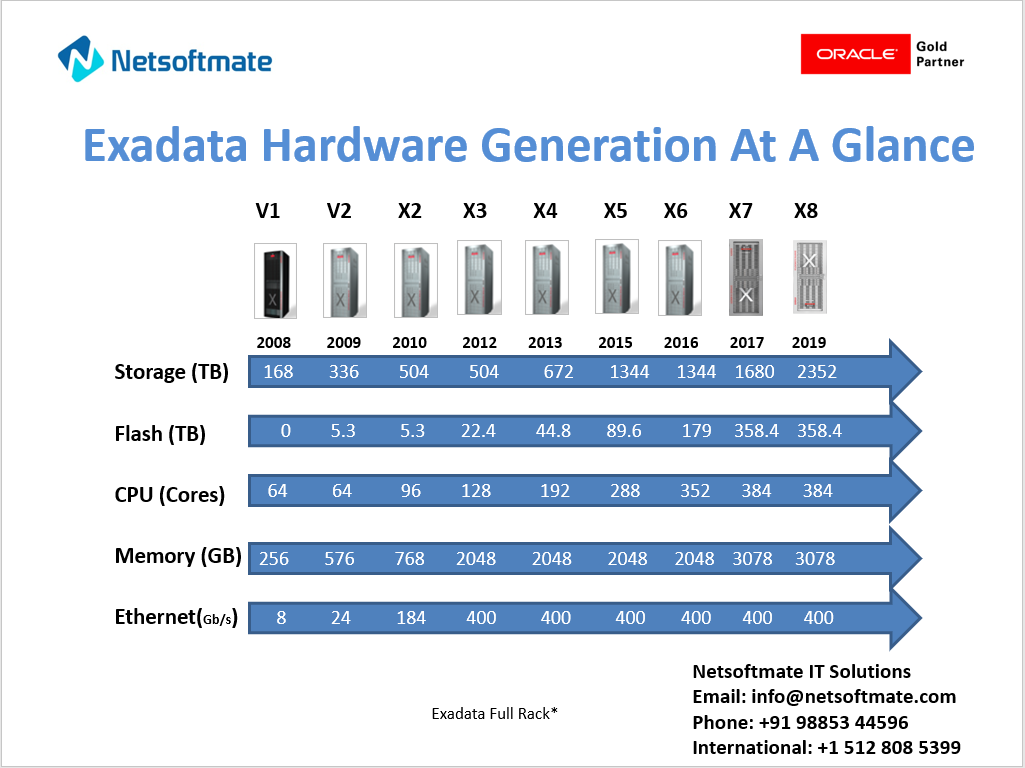
Exadata Hardware Generation At a Glance (V1 to X8)


An engineered system comprising of Compute Nodes, Storage Cells and Infiniband  – all of it packaged inside a single physical cabinet called “Exadata Rack”


Exadata Hardware Generation At A Glance


Exadata Database Machine X8-2


Wednesday, 3 April 2019

Exadata Database Machine X8-2 - First look

Oracle announced the next-generation Oracle Exadata X8 with significant hardware and software enhancements in overall performance, storage capacity, network bandwidth, and automation. Exadata X7 delivers extreme performance and reliability to run the largest, most business-critical database workloads.

Exadata X8-2 quick glance:

  • Latest Intel Xeon (8260) Processors (2.4GHz) 2*24 cores per database server (384 core in a Full Rack)
  • Exadata X8 Capacity-on-Demand enables at least 14 cores per server
  • Delivers up to 60 percent faster throughput than previous models
  • NO changes in Database server Physical memory (upto 12TB in a full Rack)
  • Latest Intel Xeon (5218) Processors (2.3GHz) 2*16 cores per Storage server (448 core in a Full Rack)
  • NO increase in the capacity of Extreme Flash storage (716.8TB in a full Rack)
  • 40% increase in disk capacity (2352TB in a full Rack)
  • Exadata X8 introduces new Exadata storage option - Extended (XT) Storage Server
  • Each Exadata XT Storage Server includes twelve 14 TB SAS disk drives
  • A full rack Exadata X8-2 system has:
    • Raw capacity of 2.3 petabytes of disk storage & 358.4TB Flash
    • 720 terabytes of NVMe all-Flash storage
    • Raw capacity of 2.3 petabytes of disk storage & No flash
  • Additional network 2x 10/25 Gb optical Ethernet (client – optional)
  • Available in Oracle Public Cloud - Oracle Database Exadata Cloud Service


https://www.oracle.com/a/ocom/docs/engineered-systems/exadata/exadata-x8-2-ds.pdf
 

https://www.oracle.com/a/ocom/docs/engineered-systems/exadata/exadata-x8-8-ds.pdf


Thursday, 21 March 2019

Step by Step Exadata Compute Node Patching 18c

The patchmgr or dbnodeupdate.sh utility can be used for upgrading, rollback and backup Exadata Compute nodes. patchmgr utility can be used for upgrading Compute nodes in a rolling or non-rolling fashion. Compute nodes patches apply operating system, firmware, and driver updates.

Launch patchmgr from the compute node that is node 1 that has user equivalence setup to all the Compute nodes. Patch all the compute nodes except node 1 and later patch node 1 alone.

In this article I will demonstrate how to perform upgrade Exadata Compute nodes using patchmgr and dbnodeupdate.sh utilities.

MOS Notes
Read the following MOS notes carefully.

  • Exadata Database Machine and Exadata Storage Server Supported Versions (Doc ID 888828.1)
  • Exadata 18.1.12.0.0 release and patch (29194095) (Doc ID 2492012.1)   
  • Oracle Exadata Database Machine exachk or HealthCheck (Doc ID 1070954.1)dbnodeupdate.sh and dbserver.patch.zip: Updating Exadata Database Server Software using the DBNodeUpdate Utility and patchmgr (Doc ID 1553103.1)   

Software Download
Download the following patches required for Upgrading Compute nodes.

  • Patch 29181093 - Database server bare metal / domU ULN exadata_dbserver_18.1.12.0.0_x86_64_base OL6 channel ISO image (18.1.12.0.0.190111)
  • Download dbserver.patch.zip as p21634633_12*_Linux-x86-64.zip, which contains dbnodeupdate.zip and patchmgr for dbnodeupdate orchestration via patch 21634633

Current Environment
Exadata X4-2 Half Rack (4 Compute nodes, 7 Storage Cells and 2 IB Switches) running ESS version 12.2.1.1.6


Prerequisites
 
  • Install and configure VNC Server on Exadata compute node 1. It is recommended to use VNC or screen utility for patching to avoid disconnections due network issues.
 
  • Enable blackout (OEM, crontab and so on)
 
  • Verify disk space on Compute nodes
[root@dm01db01 ~]# dcli -g ~/dbs_group -l root 'df -h /'
dm01db01: Filesystem            Size  Used Avail Use% Mounted on
dm01db01: /dev/mapper/VGExaDb-LVDbSys1
dm01db01: 59G   40G   17G  70% /
dm01db02: Filesystem            Size  Used Avail Use% Mounted on
dm01db02: /dev/mapper/VGExaDb-LVDbSys1
dm01db02: 59G   23G   34G  41% /
dm01db03: Filesystem            Size  Used Avail Use% Mounted on
dm01db03: /dev/mapper/VGExaDb-LVDbSys1
dm01db03: 59G   42G   14G  76% /
dm01db04: Filesystem            Size  Used Avail Use% Mounted on
dm01db04: /dev/mapper/VGExaDb-LVDbSys1
dm01db04: 59G   42G   15G  75% /

[root@dm01db01 ~]# dcli -g ~/dbs_group -l root 'df -h /u01'
dm01db01: Filesystem            Size  Used Avail Use% Mounted on
dm01db01: /dev/mapper/VGExaDb-LVDbOra1
dm01db01: 197G  112G   76G  60% /u01
dm01db02: Filesystem            Size  Used Avail Use% Mounted on
dm01db02: /dev/mapper/VGExaDb-LVDbOra1
dm01db02: 197G   66G  122G  36% /u01
dm01db03: Filesystem            Size  Used Avail Use% Mounted on
dm01db03: /dev/mapper/VGExaDb-LVDbOra1
dm01db03: 197G   77G  111G  41% /u01
dm01db04: Filesystem            Size  Used Avail Use% Mounted on
dm01db04: /dev/mapper/VGExaDb-LVDbOra1
dm01db04: 197G   61G  127G  33% /u01

 
  • Run Exachk before starting the actual patching. Correct any Critical issues and Failure that conflict with patching.
 
  • Verify hardware failure. Make sure there are no hardware failures before patching
[root@dm01db01 ~]# dcli -g ~/dbs_group -l root 'dbmcli -e list physicaldisk where status!=normal'

[root@dm01db01 ~]# dcli -g ~/dbs_group -l root 'ipmitool sunoem cli "show -d properties -level all /SYS fault_state==Faulted"'

 
  • Clear or acknowledge alerts on db and cell nodes
[root@dm01db01 ~]# dcli -l root -g ~/dbs_group "dbmcli -e  drop alerthistory all"
 
  • Download patches and copy them to the compute node 1 under staging directory
Stage Directory: /u01/app/oracle/software/exa_patches
p21634633_191200_Linux-x86-64.zip
p29181093_181000_Linux-x86-64.zip

 
  • Read the readme file and document the steps for storage cell patching.

Steps to Upgrade Exadata Compute nodes


  • Copy the compute node patches to all the nodes
[root@dm01db01 exa_patches]# dcli -g ~/dbs_group -l root 'mkdir -p /u01/app/oracle/software/exa_patches/dbnode'

[root@dm01db01 exa_patches]# cp p21634633_191200_Linux-x86-64.zip p29181093_181000_Linux-x86-64.zip dbnode/

[root@dm01db01 dbnode]# dcli -g ~/dbs_group -l root -d /u01/app/oracle/software/exa_patches/dbnode -f p21634633_191200_Linux-x86-64.zip

[root@dm01db01 dbnode]# dcli -g ~/dbs_group -l root -d /u01/app/oracle/software/exa_patches/dbnode -f p29181093_181000_Linux-x86-64.zip

[root@dm01db01 dbnode]# dcli -g ~/dbs_group -l root ls -ltr /u01/app/oracle/software/exa_patches/dbnode


  • Unzip tool patch
[root@dm01db01 dbnode]# unzip p21634633_191200_Linux-x86-64.zip

[root@dm01db01 dbnode]# ls -ltr

[root@dm01db01 dbnode]# cd dbserver_patch_19.190204/

[root@dm01db01 dbserver_patch_19.190204]# ls -ltr

[root@dm01db01 dbserver_patch_19.190204]# unzip dbnodeupdate.zip

[root@dm01db01 dbserver_patch_19.190204]# ls -ltr


NOTE: DO NOT unzip the ISO patch. IT will be extracted automatically by dbnodeupdate.sh utility

  • Umount all external file systems on all Compute nodes
[root@dm01db01 ~]# dcli -g ~/dbs_group -l root umount /zfssa/dm01/backup1

  • Get the current version
[root@dm01db01 dbnode]# imageinfo

Kernel version: 4.1.12-94.7.8.el6uek.x86_64 #2 SMP Thu Jan 11 20:41:01 PST 2018 x86_64
Image kernel version: 4.1.12-94.7.8.el6uek
Image version: 12.2.1.1.6.180125.1
Image activated: 2018-05-15 21:37:09 -0500
Image status: success
System partition on device: /dev/mapper/VGExaDb-LVDbSys1


  • Perform pre check on all nodes except node 1.
[root@dm01db01 dbserver_patch_19.190204]# ./patchmgr -dbnodes  dbs_group-1 -precheck -iso_repo /u01/app/oracle/software/exa_patches/dbnode/p29181093_181000_Linux-x86-64.zip -target_version 18.1.12.0.0.190111

************************************************************************************************************
NOTE    patchmgr release: 19.190204 (always check MOS 1553103.1 for the latest release of dbserver.patch.zip)
NOTE
WARNING Do not interrupt the patchmgr session.
WARNING Do not resize the screen. It may disturb the screen layout.
WARNING Do not reboot database nodes during update or rollback.
WARNING Do not open logfiles in write mode and do not try to alter them.
************************************************************************************************************
2019-02-11 04:26:37 -0600        :Working: DO: Initiate precheck on 3 node(s)
2019-02-11 04:27:29 -0600        :Working: DO: Check free space and verify SSH equivalence for the root user to node(s)
2019-02-11 04:29:44 -0600        :SUCCESS: DONE: Check free space and verify SSH equivalence for the root user to node(s)
2019-02-11 04:31:06 -0600        :Working: DO: dbnodeupdate.sh running a precheck on node(s).
2019-02-11 04:32:53 -0600        :SUCCESS: DONE: Initiate precheck on node(s).


  • Perform compute node backup
[root@dm01db01 dbserver_patch_19.190204]# ./patchmgr -dbnodes dbs_group-1 -backup -iso_repo /u01/app/oracle/software/exa_patches/dbnode/p29181093_181000_Linux-x86-64.zip -target_version 18.1.12.0.0.190111


************************************************************************************************************
NOTE    patchmgr release: 19.190204 (always check MOS 1553103.1 for the latest release of dbserver.patch.zip)
NOTE
WARNING Do not interrupt the patchmgr session.
WARNING Do not resize the screen. It may disturb the screen layout.
WARNING Do not reboot database nodes during update or rollback.
WARNING Do not open logfiles in write mode and do not try to alter them.
************************************************************************************************************
2019-02-11 04:43:16 -0600        :Working: DO: Initiate backup on 3 node(s).
2019-02-11 04:43:16 -0600        :Working: DO: Check free space and verify SSH equivalence for the root user to node(s)
2019-02-11 04:45:31 -0600        :SUCCESS: DONE: Check free space and verify SSH equivalence for the root user to node(s)
2019-02-11 04:46:16 -0600        :Working: DO: dbnodeupdate.sh running a backup on node(s).
2019-02-11 04:58:03 -0600        :SUCCESS: DONE: Initiate backup on node(s).
2019-02-11 04:58:03 -0600        :SUCCESS: DONE: Initiate backup on 3 node(s)


  • Execute compute node upgrade
[root@dm01db01 dbserver_patch_19.190204]# ./patchmgr -dbnodes dbs_group-1 -upgrade -iso_repo /u01/app/oracle/software/exa_patches/dbnode/p29181093_181000_Linux-x86-64.zip -target_version 18.1.12.0.0.190111

************************************************************************************************************
NOTE    patchmgr release: 19.190204 (always check MOS 1553103.1 for the latest release of dbserver.patch.zip)
NOTE
NOTE    Database nodes will reboot during the update process.
NOTE
WARNING Do not interrupt the patchmgr session.
WARNING Do not resize the screen. It may disturb the screen layout.
WARNING Do not reboot database nodes during update or rollback.
WARNING Do not open logfiles in write mode and do not try to alter them.
************************************************************************************************************
2019-02-11 05:05:24 -0600        :Working: DO: Initiate prepare steps on node(s).
2019-02-11 05:05:29 -0600        :Working: DO: Check free space and verify SSH equivalence for the root user to node(s)
2019-02-11 05:07:44 -0600        :SUCCESS: DONE: Check free space and verify SSH equivalence for the root user to node(s)
2019-02-11 05:09:35 -0600        :SUCCESS: DONE: Initiate prepare steps on node(s).
2019-02-11 05:09:35 -0600        :Working: DO: Initiate update on 3 node(s).
2019-02-11 05:09:35 -0600        :Working: DO: dbnodeupdate.sh running a backup on 3 node(s).
2019-02-11 05:21:06 -0600        :SUCCESS: DONE: dbnodeupdate.sh running a backup on 3 node(s).
2019-02-11 05:21:06 -0600        :Working: DO: Initiate update on node(s)
2019-02-11 05:21:11 -0600        :Working: DO: Get information about any required OS upgrades from node(s).
2019-02-11 05:21:22 -0600        :SUCCESS: DONE: Get information about any required OS upgrades from node(s).
2019-02-11 05:21:22 -0600        :Working: DO: dbnodeupdate.sh running an update step on all nodes.
2019-02-11 05:32:58 -0600        :INFO   : dm01db02 is ready to reboot.
2019-02-11 05:32:58 -0600        :INFO   : dm01db03 is ready to reboot.
2019-02-11 05:32:58 -0600        :INFO   : dm01db04 is ready to reboot.
2019-02-11 05:32:58 -0600        :SUCCESS: DONE: dbnodeupdate.sh running an update step on all nodes.
2019-02-11 05:33:26 -0600        :Working: DO: Initiate reboot on node(s)
2019-02-11 05:34:13 -0600        :SUCCESS: DONE: Initiate reboot on node(s)
2019-02-11 05:34:13 -0600        :Working: DO: Waiting to ensure node(s) is down before reboot.
2019-02-11 05:34:45 -0600        :SUCCESS: DONE: Waiting to ensure node(s) is down before reboot.
2019-02-11 05:34:45 -0600        :Working: DO: Waiting to ensure node(s) is up after reboot.
2019-02-11 05:39:51 -0600        :SUCCESS: DONE: Waiting to ensure node(s) is up after reboot.
2019-02-11 05:39:51 -0600        :Working: DO: Waiting to connect to node(s) with SSH. During Linux upgrades this can take some time.
2019-02-11 06:02:50 -0600        :SUCCESS: DONE: Waiting to connect to node(s) with SSH. During Linux upgrades this can take some time.
2019-02-11 06:02:50 -0600        :Working: DO: Wait for node(s) is ready for the completion step of update.
2019-02-11 06:04:14 -0600        :SUCCESS: DONE: Wait for node(s) is ready for the completion step of update.
2019-02-11 06:04:30 -0600        :Working: DO: Initiate completion step from dbnodeupdate.sh on node(s)
2019-02-11 06:24:40 -0600        :ERROR  : Completion step from dbnodeupdate.sh failed on one or more nodes
2019-02-11 06:24:45 -0600        :SUCCESS: DONE: Initiate completion step from dbnodeupdate.sh on dm01db02
2019-02-11 06:25:29 -0600        :SUCCESS: DONE: Get information about downgrade version from node.


    SUMMARY OF ERRORS FOR dm01db03:

2019-02-11 06:25:29 -0600        :ERROR  : There was an error during the completion step on dm01db03.
2019-02-11 06:25:29 -0600        :ERROR  : Please correct the error and run "/u01/dbnodeupdate.patchmgr/dbnodeupdate.sh -c" on dm01db03 to complete the update.
2019-02-11 06:25:29 -0600        :ERROR  : The dbnodeupdate.log and diag files can help to find the root cause.
2019-02-11 06:25:29 -0600        :ERROR  : DONE: Initiate completion step from dbnodeupdate.sh on dm01db03
2019-02-11 06:25:29 -0600        :SUCCESS: DONE: Initiate completion step from dbnodeupdate.sh on dm01db04
2019-02-11 06:26:38 -0600        :INFO   : SUMMARY FOR ALL NODES:
2019-02-11 06:25:28 -0600        :       : dm01db02 has state: SUCCESS
2019-02-11 06:25:29 -0600        :ERROR  : dm01db03 has state: COMPLETE STEP FAILED
2019-02-11 06:26:12 -0600        :       : dm01db04 has state: SUCCESS
2019-02-11 06:26:38 -0600        :FAILED : For details, check the following files in the /u01/app/oracle/software/exa_patches/dbnode/dbserver_patch_19.190204:
2019-02-11 06:26:38 -0600        :FAILED :  - <dbnode_name>_dbnodeupdate.log
2019-02-11 06:26:38 -0600        :FAILED :  - patchmgr.log
2019-02-11 06:26:38 -0600        :FAILED :  - patchmgr.trc
2019-02-11 06:26:38 -0600        :FAILED : DONE: Initiate update on node(s).

[INFO     ] Collected dbnodeupdate diag in file: Diag_patchmgr_dbnode_upgrade_110219050516.tbz
-rw-r--r-- 1 root root 10358047 Feb 11 06:26 Diag_patchmgr_dbnode_upgrade_110219050516.tbz


Note: The compute node upgrade failed for the node 3.

Review the logs to identify the cause of upgrade failure on node 3.

[root@dm01db01 dbserver_patch_19.190204]# cd /u01/app/oracle/software/exa_patches/dbnode/dbserver_patch_19.190204

[root@dm01db01 dbserver_patch_19.190204]# view dm01db03_dbnodeupdate.log

[1549886671][2019-02-11 06:24:34 -0600][ERROR][/u01/dbnodeupdate.patchmgr/dbnodeupdate.sh][PrintGenError][]  Unable to start stack, see /var/log/cellos/dbnodeupdate.log for more info. Re-run dbnodeupdate.sh -c after resolving the issue. If you wish to skip relinking append an extra '-i' flag. Exiting...


From the above log file and error message, we can see that the upgrade failed while trying to start the Clusterware.

Solution: Connect to node 3 and stop the clusterware and execute the command "/u01/dbnodeupdate.patchmgr/dbnodeupdate.sh -c -s" to complete the upgrade on node 3.

[root@dm01db01 dbserver_patch_19.190204]# ssh dm01db03
Last login: Mon Feb 11 04:13:00 2019 from dm01db01.netsoftmate.com

[root@dm01db03 ~]# uptime
 06:34:55 up 35 min,  1 user,  load average: 0.02, 0.11, 0.19

[root@dm01db03 ~]# /u01/app/11.2.0.4/grid/bin/crsctl check crs
CRS-4638: Oracle High Availability Services is online
CRS-4535: Cannot communicate with Cluster Ready Services
CRS-4530: Communications failure contacting Cluster Synchronization Services daemon
CRS-4534: Cannot communicate with Event Manager

[root@dm01db03 ~]# /u01/app/11.2.0.4/grid/bin/crsctl stop crs -f
CRS-2791: Starting shutdown of Oracle High Availability Services-managed resources on 'dm01db03'
CRS-2673: Attempting to stop 'ora.crf' on 'dm01db03'
CRS-2673: Attempting to stop 'ora.mdnsd' on 'dm01db03'
CRS-2673: Attempting to stop 'ora.diskmon' on 'dm01db03'
CRS-2677: Stop of 'ora.crf' on 'dm01db03' succeeded
CRS-2673: Attempting to stop 'ora.gipcd' on 'dm01db03'
CRS-2677: Stop of 'ora.mdnsd' on 'dm01db03' succeeded
CRS-2677: Stop of 'ora.diskmon' on 'dm01db03' succeeded
CRS-2677: Stop of 'ora.gipcd' on 'dm01db03' succeeded
CRS-2673: Attempting to stop 'ora.gpnpd' on 'dm01db03'
CRS-2677: Stop of 'ora.gpnpd' on 'dm01db03' succeeded
CRS-2793: Shutdown of Oracle High Availability Services-managed resources on 'dm01db03' has completed
CRS-4133: Oracle High Availability Services has been stopped.
[root@dm01db03 ~]# /u01/app/11.2.0.4/grid/bin/crsctl start crs
CRS-4123: Oracle High Availability Services has been started.


[root@dm01db03 ~]# /u01/dbnodeupdate.patchmgr/dbnodeupdate.sh -c -s
  (*) 2019-02-11 06:42:42: Initializing logfile /var/log/cellos/dbnodeupdate.log
##########################################################################################################################
#                                                                                                                        #
# Guidelines for using dbnodeupdate.sh (rel. 19.190204):                                                                 #
#                                                                                                                        #
# - Prerequisites for usage:                                                                                             #
#         1. Refer to dbnodeupdate.sh options. See MOS 1553103.1                                                         #
#         2. Always use the latest release of dbnodeupdate.sh. See patch 21634633                                        #
#         3. Run the prereq check using the '-v' flag.                                                                   #
#         4. Run the prereq check with the '-M' to allow rpms being removed and preupdated to make precheck work.        #
#                                                                                                                        #
#   I.e.:  ./dbnodeupdate.sh -u -l /u01/my-iso-repo.zip -v  (may see rpm conflicts)                                      #
#          ./dbnodeupdate.sh -u -l http://my-yum-repo -v -M (resolved known rpm comflicts)                               #
#                                                                                                                        #
# - Prerequisite rpm dependency check failures can happen due to customization:                                          #
#     - The prereq check detects dependency issues that need to be addressed prior to running a successful update.       #
#     - Customized rpm packages may fail the built-in dependency check and system updates cannot proceed until resolved. #
#     - Prereq check may fail because -M flag was not used and known conflicting rpms were not removed.                  #
#                                                                                                                        #
#   When upgrading to releases 11.2.3.3.0 or later:                                                                      #
#      - When 'exact' package dependency check fails 'minimum' package dependency check will be tried.                   #
#      - When 'minimum' package dependency check fails, conflicting packages should be removed before proceeding.        #
#                                                                                                                        #
# - As part of the prereq checks and as part of the update, a number of rpms will be removed.                            #
#   This removal is required to preserve Exadata functioning. This should not be confused with obsolete packages.        #
#   Running without -M at prereq time may result in a Yum dependency prereq checks fail                                  #
#                                                                                                                        #
# - In case of any problem when filing an SR, upload the following:                                                      #
#      - /var/log/cellos/dbnodeupdate.log                                                                                #
#      - /var/log/cellos/dbnodeupdate.<runid>.diag                                                                       #
#      - where <runid> is the unique number of the failing run.                                                          #
#                                                                                                                        #
#                                                                                                                        #
##########################################################################################################################
Continue ? [y/n] y

  (*) 2019-02-11 06:42:45: Unzipping helpers (/u01/dbnodeupdate.patchmgr/dbupdate-helpers.zip) to /opt/oracle.SupportTools/dbnodeupdate_helpers
  (*) 2019-02-11 06:42:48: Collecting system configuration settings. This may take a while...

Active Image version   : 18.1.12.0.0.190111
Active Kernel version  : 4.1.12-94.8.10.el6uek
Active LVM Name        : /dev/mapper/VGExaDb-LVDbSys1
Inactive Image version : 12.2.1.1.6.180125.1
Inactive LVM Name      : /dev/mapper/VGExaDb-LVDbSys2
Current user id        : root
Action                 : finish-post (validate image status, fix known issues, cleanup, relink and enable crs to auto-start)
Shutdown stack         : Yes (Currently stack is up)
Logfile                : /var/log/cellos/dbnodeupdate.log (runid: 110219064242)
Diagfile               : /var/log/cellos/dbnodeupdate.110219064242.diag
Server model           : SUN SERVER X4-2
dbnodeupdate.sh rel.   : 19.190204 (always check MOS 1553103.1 for the latest release of dbnodeupdate.sh)


The following known issues will be checked for but require manual follow-up:
  (*) - Yum rolling update requires fix for 11768055 when Grid Infrastructure is below 11.2.0.2 BP12


Continue ? [y/n] y


  (*) 2019-02-11 06:46:55: Verifying GI and DB's are shutdown
  (*) 2019-02-11 06:46:56: Shutting down GI and db
  (*) 2019-02-11 06:47:39: No rpms to remove
  (*) 2019-02-11 06:47:43: EM agent in /u01/app/oracle/product/Agent12c/core/12.1.0.4.0 stopped
  (*) 2019-02-11 06:47:48: EM agent in /opt/OracleHomes/agent_home/core/12.1.0.4.0 stopped
  (*) 2019-02-11 06:47:48: Relinking all homes
  (*) 2019-02-11 06:47:48: Unlocking /u01/app/11.2.0.4/grid
  (*) 2019-02-11 06:47:57: Relinking /u01/app/11.2.0.4/grid as oracle (with rds option)
  (*) 2019-02-11 06:48:04: Relinking /u01/app/oracle/product/11.2.0.4/dbhome_1 as oracle (with rds option)
  (*) 2019-02-11 06:48:09: Locking and starting Grid Infrastructure (/u01/app/11.2.0.4/grid)
  (*) 2019-02-11 06:50:40: Sleeping another 60 seconds while stack is starting (1/15)
  (*) 2019-02-11 06:50:40: Stack started
  (*) 2019-02-11 06:51:08: TFA Started
  (*) 2019-02-11 06:51:08: Enabling stack to start at reboot. Disable this when the stack should not be starting on a next boot
  (*) 2019-02-11 06:51:21: EM agent in /u01/app/oracle/product/Agent12c/core/12.1.0.4.0 started
  (*) 2019-02-11 06:52:56: EM agent in /opt/OracleHomes/agent_home/core/12.1.0.4.0 started
  (*) 2019-02-11 06:52:56: Purging any extra jdk packages.
  (*) 2019-02-11 06:52:56: No jdk package cleanup needed. Retained jdk package installed: jdk1.8-1.8.0_191.x86_64
  (*) 2019-02-11 06:52:56: Retained the required kernel-transition package: kernel-transition-2.6.32-0.0.0.3.el6
  (*) 2019-02-11 06:53:09: Capturing service status and file attributes. This may take a while...
  (*) 2019-02-11 06:53:09: Service status and file attribute report in: /etc/exadata/reports
  (*) 2019-02-11 06:53:09: All post steps are finished.


  • Monitoring compute node upgrade.
[root@dm01db01 dbserver_patch_19.190204]# tail -f patchmgr.trc

  • Now patch node 1 using dbnodeupdate.sh or patchmgr. Here we will use the dbnodeupdate.sh utility to patch node 1.
[root@dm01db01 dbserver_patch_19.190204]# ./dbnodeupdate.sh -u -l /u01/app/oracle/software/exa_patches/dbnode/p29181093_181000_Linux-x86-64.zip -v
  (*) 2019-02-11 06:59:59: Initializing logfile /var/log/cellos/dbnodeupdate.log
##########################################################################################################################
#                                                                                                                        #
# Guidelines for using dbnodeupdate.sh (rel. 19.190204):                                                                 #
#                                                                                                                        #
# - Prerequisites for usage:                                                                                             #
#         1. Refer to dbnodeupdate.sh options. See MOS 1553103.1                                                         #
#         2. Always use the latest release of dbnodeupdate.sh. See patch 21634633                                        #
#         3. Run the prereq check using the '-v' flag.                                                                   #
#         4. Run the prereq check with the '-M' to allow rpms being removed and preupdated to make precheck work.        #
#                                                                                                                        #
#   I.e.:  ./dbnodeupdate.sh -u -l /u01/my-iso-repo.zip -v  (may see rpm conflicts)                                      #
#          ./dbnodeupdate.sh -u -l http://my-yum-repo -v -M (resolved known rpm comflicts)                               #
#                                                                                                                        #
# - Prerequisite rpm dependency check failures can happen due to customization:                                          #
#     - The prereq check detects dependency issues that need to be addressed prior to running a successful update.       #
#     - Customized rpm packages may fail the built-in dependency check and system updates cannot proceed until resolved. #
#     - Prereq check may fail because -M flag was not used and known conflicting rpms were not removed.                  #
#                                                                                                                        #
#   When upgrading to releases 11.2.3.3.0 or later:                                                                      #
#      - When 'exact' package dependency check fails 'minimum' package dependency check will be tried.                   #
#      - When 'minimum' package dependency check fails, conflicting packages should be removed before proceeding.        #
#                                                                                                                        #
# - As part of prereq check without specifying -M flag NO rpms will be removed. This may result in prereq check failing. #
#        The following file lists the commands that would have been executed for removing rpms when specifying -M flag.  #
#        File: /var/log/cellos/nomodify_results.110219065959.sh.                                                         #
#                                                                                                                        #
# - In case of any problem when filing an SR, upload the following:                                                      #
#      - /var/log/cellos/dbnodeupdate.log                                                                                #
#      - /var/log/cellos/dbnodeupdate.<runid>.diag                                                                       #
#      - where <runid> is the unique number of the failing run.                                                          #
#                                                                                                                        #
#      *** This is a verify only run without -M specified, no changes will be made to make prereq check work. ***        #
#                                                                                                                        #
##########################################################################################################################
Continue ? [y/n] y

  (*) 2019-02-11 07:00:11: Unzipping helpers (/u01/app/oracle/software/exa_patches/dbnode/dbserver_patch_19.190204/dbupdate-helpers.zip) to /opt/oracle.SupportTools/dbnodeupdate_helpers
  (*) 2019-02-11 07:00:14: Collecting system configuration settings. This may take a while...
  (*) 2019-02-11 07:01:01: Validating system settings for known issues and best practices. This may take a while...
  (*) 2019-02-11 07:01:01: Checking free space in /u01/app/oracle/software/exa_patches/dbnode/iso.stage
  (*) 2019-02-11 07:01:01: Unzipping /u01/app/oracle/software/exa_patches/dbnode/p29181093_181000_Linux-x86-64.zip to /u01/app/oracle/software/exa_patches/dbnode/iso.stage, this may take a while
  (*) 2019-02-11 07:01:11: Generating Exadata repository file /etc/yum.repos.d/Exadata-computenode.repo
  (*) 2019-02-11 07:01:50: Validating the specified source location.
  (*) 2019-02-11 07:01:51: Cleaning up the yum cache.
  (*) 2019-02-11 07:01:53: Performing yum package dependency check for 'exact' dependencies. This may take a while...
  (*) 2019-02-11 07:02:00: 'Exact' package dependency check succeeded.
  (*) 2019-02-11 07:02:00: 'Minimum' package dependency check succeeded.

-----------------------------------------------------------------------------------------------------------------------------
Running in prereq check mode. Flag -M was not specified this means NO rpms will be pre-updated or removed to make the prereq check work.
-----------------------------------------------------------------------------------------------------------------------------
Active Image version   : 12.2.1.1.6.180125.1
Active Kernel version  : 4.1.12-94.7.8.el6uek
Active LVM Name        : /dev/mapper/VGExaDb-LVDbSys1
Inactive Image version : 12.1.2.3.6.170713
Inactive LVM Name      : /dev/mapper/VGExaDb-LVDbSys2
Current user id        : root
Action                 : upgrade
Upgrading to           : 18.1.12.0.0.190111 (to exadata-sun-computenode-exact)
Baseurl                : file:///var/www/html/yum/unknown/EXADATA/dbserver/110219065959/x86_64/ (iso)
Iso file               : /u01/app/oracle/software/exa_patches/dbnode/iso.stage/exadata_ol6_base_repo_18.1.12.0.0.190111.iso
Create a backup        : Yes
Shutdown EM agents     : Yes
Shutdown stack         : No (Currently stack is up)
Missing package files  : Not tested.
RPM exclusion list     : Not in use (add rpms to /etc/exadata/yum/exclusion.lst and restart dbnodeupdate.sh)
RPM obsolete lists     : /etc/exadata/yum/obsolete_nodeps.lst, /etc/exadata/yum/obsolete.lst (lists rpms to be removed by the update)
                       : RPM obsolete list is extracted from exadata-sun-computenode-18.1.12.0.0.190111-1.noarch.rpm
Exact dependencies     : No conflicts
Minimum dependencies   : No conflicts
Logfile                : /var/log/cellos/dbnodeupdate.log (runid: 110219065959)
Diagfile               : /var/log/cellos/dbnodeupdate.110219065959.diag
Server model           : SUN SERVER X4-2
dbnodeupdate.sh rel.   : 19.190204 (always check MOS 1553103.1 for the latest release of dbnodeupdate.sh)
Note                   : After upgrading and rebooting run './dbnodeupdate.sh -c' to finish post steps.


The following known issues will be checked for but require manual follow-up:
  (*) - Yum rolling update requires fix for 11768055 when Grid Infrastructure is below 11.2.0.2 BP12
   Prereq check finished successfully, check the above report for next steps.
   When needed: run prereq check with -M to remove known rpm dependency failures or execute the commands in dm01db01:/var/log/cellos/nomodify_results.110219065959.sh.

  (*) 2019-02-11 07:02:07: Cleaning up iso and temp mount points

[root@dm01db01 dbserver_patch_19.190204]#


[root@dm01db01 dbserver_patch_19.190204]# ./dbnodeupdate.sh -u -l /u01/app/oracle/software/exa_patches/dbnode/p29181093_181000_Linux-x86-64.zip -s
  (*) 2019-02-11 07:12:44: Initializing logfile /var/log/cellos/dbnodeupdate.log
##########################################################################################################################
#                                                                                                                        #
# Guidelines for using dbnodeupdate.sh (rel. 19.190204):                                                                 #
#                                                                                                                        #
# - Prerequisites for usage:                                                                                             #
#         1. Refer to dbnodeupdate.sh options. See MOS 1553103.1                                                         #
#         2. Always use the latest release of dbnodeupdate.sh. See patch 21634633                                        #
#         3. Run the prereq check using the '-v' flag.                                                                   #
#         4. Run the prereq check with the '-M' to allow rpms being removed and preupdated to make precheck work.        #
#                                                                                                                        #
#   I.e.:  ./dbnodeupdate.sh -u -l /u01/my-iso-repo.zip -v  (may see rpm conflicts)                                      #
#          ./dbnodeupdate.sh -u -l http://my-yum-repo -v -M (resolved known rpm comflicts)                               #
#                                                                                                                        #
# - Prerequisite rpm dependency check failures can happen due to customization:                                          #
#     - The prereq check detects dependency issues that need to be addressed prior to running a successful update.       #
#     - Customized rpm packages may fail the built-in dependency check and system updates cannot proceed until resolved. #
#     - Prereq check may fail because -M flag was not used and known conflicting rpms were not removed.                  #
#                                                                                                                        #
#   When upgrading to releases 11.2.3.3.0 or later:                                                                      #
#      - When 'exact' package dependency check fails 'minimum' package dependency check will be tried.                   #
#      - When 'minimum' package dependency check fails, conflicting packages should be removed before proceeding.        #
#                                                                                                                        #
# - As part of the prereq checks and as part of the update, a number of rpms will be removed.                            #
#   This removal is required to preserve Exadata functioning. This should not be confused with obsolete packages.        #
#   Running without -M at prereq time may result in a Yum dependency prereq checks fail                                  #
#                                                                                                                        #
# - In case of any problem when filing an SR, upload the following:                                                      #
#      - /var/log/cellos/dbnodeupdate.log                                                                                #
#      - /var/log/cellos/dbnodeupdate.<runid>.diag                                                                       #
#      - where <runid> is the unique number of the failing run.                                                          #
#                                                                                                                        #
#      *** This is an update run, changes will be made. ***                                                              #
#                                                                                                                        #
##########################################################################################################################
Continue ? [y/n] y

  (*) 2019-02-11 07:12:47: Unzipping helpers (/u01/app/oracle/software/exa_patches/dbnode/dbserver_patch_19.190204/dbupdate-helpers.zip) to /opt/oracle.SupportTools/dbnodeupdate_helpers
  (*) 2019-02-11 07:12:49: Collecting system configuration settings. This may take a while...
  (*) 2019-02-11 07:13:38: Validating system settings for known issues and best practices. This may take a while...
  (*) 2019-02-11 07:13:38: Checking free space in /u01/app/oracle/software/exa_patches/dbnode/iso.stage
  (*) 2019-02-11 07:13:38: Unzipping /u01/app/oracle/software/exa_patches/dbnode/p29181093_181000_Linux-x86-64.zip to /u01/app/oracle/software/exa_patches/dbnode/iso.stage, this may take a while
  (*) 2019-02-11 07:13:48: Generating Exadata repository file /etc/yum.repos.d/Exadata-computenode.repo
  (*) 2019-02-11 07:14:27: Validating the specified source location.
  (*) 2019-02-11 07:14:28: Cleaning up the yum cache.
  (*) 2019-02-11 07:14:31: Performing yum package dependency check for 'exact' dependencies. This may take a while...
  (*) 2019-02-11 07:14:38: 'Exact' package dependency check succeeded.
  (*) 2019-02-11 07:14:38: 'Minimum' package dependency check succeeded.

Active Image version   : 12.2.1.1.6.180125.1
Active Kernel version  : 4.1.12-94.7.8.el6uek
Active LVM Name        : /dev/mapper/VGExaDb-LVDbSys1
Inactive Image version : 12.1.2.3.6.170713
Inactive LVM Name      : /dev/mapper/VGExaDb-LVDbSys2
Current user id        : root
Action                 : upgrade
Upgrading to           : 18.1.12.0.0.190111 (to exadata-sun-computenode-exact)
Baseurl                : file:///var/www/html/yum/unknown/EXADATA/dbserver/110219071244/x86_64/ (iso)
Iso file               : /u01/app/oracle/software/exa_patches/dbnode/iso.stage/exadata_ol6_base_repo_18.1.12.0.0.190111.iso
Create a backup        : Yes
Shutdown EM agents     : Yes
Shutdown stack         : Yes (Currently stack is up)
Missing package files  : Not tested.
RPM exclusion list     : Not in use (add rpms to /etc/exadata/yum/exclusion.lst and restart dbnodeupdate.sh)
RPM obsolete lists     : /etc/exadata/yum/obsolete_nodeps.lst, /etc/exadata/yum/obsolete.lst (lists rpms to be removed by the update)
                       : RPM obsolete list is extracted from exadata-sun-computenode-18.1.12.0.0.190111-1.noarch.rpm
Exact dependencies     : No conflicts
Minimum dependencies   : No conflicts
Logfile                : /var/log/cellos/dbnodeupdate.log (runid: 110219071244)
Diagfile               : /var/log/cellos/dbnodeupdate.110219071244.diag
Server model           : SUN SERVER X4-2
dbnodeupdate.sh rel.   : 19.190204 (always check MOS 1553103.1 for the latest release of dbnodeupdate.sh)
Note                   : After upgrading and rebooting run './dbnodeupdate.sh -c' to finish post steps.


The following known issues will be checked for but require manual follow-up:
  (*) - Yum rolling update requires fix for 11768055 when Grid Infrastructure is below 11.2.0.2 BP12


Continue ? [y/n] y

  (*) 2019-02-11 07:15:45: Verifying GI and DB's are shutdown
  (*) 2019-02-11 07:15:45: Shutting down GI and db
  (*) 2019-02-11 07:17:00: Unmount of /boot successful
  (*) 2019-02-11 07:17:00: Check for /dev/sda1 successful
  (*) 2019-02-11 07:17:00: Mount of /boot successful
  (*) 2019-02-11 07:17:00: Disabling stack from starting
  (*) 2019-02-11 07:17:00: Performing filesystem backup to /dev/mapper/VGExaDb-LVDbSys2. Avg. 30 minutes (maximum 120) depends per environment.......................................................................................................................................
  (*) 2019-02-11 07:28:38: Backup successful
  (*) 2019-02-11 07:28:39: ExaWatcher stopped successful
  (*) 2019-02-11 07:28:53: EM agent in /u01/app/oracle/product/Agent12c/core/12.1.0.4.0 stopped
  (*) 2019-02-11 07:29:06: EM agent in /opt/OracleHomes/agent_home/core/12.1.0.4.0 stopped
  (*) 2019-02-11 07:29:06: Auto-start of EM agents disabled
  (*) 2019-02-11 07:29:15: Capturing service status and file attributes. This may take a while...
  (*) 2019-02-11 07:29:16: Service status and file attribute report in: /etc/exadata/reports
  (*) 2019-02-11 07:29:27: MS stopped successful
  (*) 2019-02-11 07:29:31: Validating the specified source location.
  (*) 2019-02-11 07:29:33: Cleaning up the yum cache.
  (*) 2019-02-11 07:29:36: Performing yum update. Node is expected to reboot when finished.
  (*) 2019-02-11 07:33:41: Waiting for post rpm script to finish. Sleeping another 60 seconds (60 / 900)

Remote broadcast message (Mon Feb 11 07:33:50 2019):

Exadata post install steps started.
  It may take up to 15 minutes.
  (*) 2019-02-11 07:34:41: Waiting for post rpm script to finish. Sleeping another 60 seconds (120 / 900)
  (*) 2019-02-11 07:35:41: Waiting for post rpm script to finish. Sleeping another 60 seconds (180 / 900)
  (*) 2019-02-11 07:36:41: Waiting for post rpm script to finish. Sleeping another 60 seconds (240 / 900)

Remote broadcast message (Mon Feb 11 07:37:08 2019):

Exadata post install steps completed.
  (*) 2019-02-11 07:37:41: Waiting for post rpm script to finish. Sleeping another 60 seconds (300 / 900)
  (*) 2019-02-11 07:38:42: All post steps are finished.

  (*) 2019-02-11 07:38:42: System will reboot automatically for changes to take effect
  (*) 2019-02-11 07:38:42: After reboot run "./dbnodeupdate.sh -c" to complete the upgrade
  (*) 2019-02-11 07:39:04: Cleaning up iso and temp mount points
 
  (*) 2019-02-11 07:39:06: Rebooting now...


WAIT FOR FEW MINUTES SO THE SEVER IS REBOOTED

OPEN A NEW SESSION AND RUN THE FOLLOWING COMMAND TO COMPLETE THE NODE 1 UPGRADE.


[root@dm01db01 ~]# cd /u01/app/oracle/software/exa_patches/dbnode/dbserver_patch_19.190204/

[root@dm01db01 dbserver_patch_19.190204]# ./dbnodeupdate.sh -c -s
  (*) 2019-02-11 09:46:54: Initializing logfile /var/log/cellos/dbnodeupdate.log
##########################################################################################################################
#                                                                                                                        #
# Guidelines for using dbnodeupdate.sh (rel. 19.190204):                                                                 #
#                                                                                                                        #
# - Prerequisites for usage:                                                                                             #
#         1. Refer to dbnodeupdate.sh options. See MOS 1553103.1                                                         #
#         2. Always use the latest release of dbnodeupdate.sh. See patch 21634633                                        #
#         3. Run the prereq check using the '-v' flag.                                                                   #
#         4. Run the prereq check with the '-M' to allow rpms being removed and preupdated to make precheck work.        #
#                                                                                                                        #
#   I.e.:  ./dbnodeupdate.sh -u -l /u01/my-iso-repo.zip -v  (may see rpm conflicts)                                      #
#          ./dbnodeupdate.sh -u -l http://my-yum-repo -v -M (resolved known rpm comflicts)                               #
#                                                                                                                        #
# - Prerequisite rpm dependency check failures can happen due to customization:                                          #
#     - The prereq check detects dependency issues that need to be addressed prior to running a successful update.       #
#     - Customized rpm packages may fail the built-in dependency check and system updates cannot proceed until resolved. #
#     - Prereq check may fail because -M flag was not used and known conflicting rpms were not removed.                  #
#                                                                                                                        #
#   When upgrading to releases 11.2.3.3.0 or later:                                                                      #
#      - When 'exact' package dependency check fails 'minimum' package dependency check will be tried.                   #
#      - When 'minimum' package dependency check fails, conflicting packages should be removed before proceeding.        #
#                                                                                                                        #
# - As part of the prereq checks and as part of the update, a number of rpms will be removed.                            #
#   This removal is required to preserve Exadata functioning. This should not be confused with obsolete packages.        #
#   Running without -M at prereq time may result in a Yum dependency prereq checks fail                                  #
#                                                                                                                        #
# - In case of any problem when filing an SR, upload the following:                                                      #
#      - /var/log/cellos/dbnodeupdate.log                                                                                #
#      - /var/log/cellos/dbnodeupdate.<runid>.diag                                                                       #
#      - where <runid> is the unique number of the failing run.                                                          #
#                                                                                                                        #
#                                                                                                                        #
##########################################################################################################################
Continue ? [y/n] y

  (*) 2019-02-11 09:46:56: Unzipping helpers (/u01/app/oracle/software/exa_patches/dbnode/dbserver_patch_19.190204/dbupdate-helpers.zip) to /opt/oracle.SupportTools/dbnodeupdate_helpers
  (*) 2019-02-11 09:46:59: Collecting system configuration settings. This may take a while...

Active Image version   : 18.1.12.0.0.190111
Active Kernel version  : 4.1.12-94.8.10.el6uek
Active LVM Name        : /dev/mapper/VGExaDb-LVDbSys1
Inactive Image version : 12.2.1.1.6.180125.1
Inactive LVM Name      : /dev/mapper/VGExaDb-LVDbSys2
Current user id        : root
Action                 : finish-post (validate image status, fix known issues, cleanup, relink and enable crs to auto-start)
Shutdown stack         : Yes (Currently stack is up)
Logfile                : /var/log/cellos/dbnodeupdate.log (runid: 110219094654)
Diagfile               : /var/log/cellos/dbnodeupdate.110219094654.diag
Server model           : SUN SERVER X4-2
dbnodeupdate.sh rel.   : 19.190204 (always check MOS 1553103.1 for the latest release of dbnodeupdate.sh)


The following known issues will be checked for but require manual follow-up:
  (*) - Yum rolling update requires fix for 11768055 when Grid Infrastructure is below 11.2.0.2 BP12


Continue ? [y/n] y

  (*) 2019-02-11 09:54:33: Verifying GI and DB's are shutdown
  (*) 2019-02-11 09:54:33: Shutting down GI and db
  (*) 2019-02-11 09:55:27: No rpms to remove
  (*) 2019-02-11 09:55:28: Relinking all homes
  (*) 2019-02-11 09:55:28: Unlocking /u01/app/11.2.0.4/grid
  (*) 2019-02-11 09:55:37: Relinking /u01/app/11.2.0.4/grid as oracle (with rds option)
  (*) 2019-02-11 09:55:52: Relinking /u01/app/oracle/product/11.2.0.4/dbhome_1 as oracle (with rds option)
  (*) 2019-02-11 09:56:06: Locking and starting Grid Infrastructure (/u01/app/11.2.0.4/grid)
  (*) 2019-02-11 09:58:36: Sleeping another 60 seconds while stack is starting (1/15)
  (*) 2019-02-11 09:58:36: Stack started
  (*) 2019-02-11 10:00:14: TFA Started
  (*) 2019-02-11 10:00:14: Enabling stack to start at reboot. Disable this when the stack should not be starting on a next boot
  (*) 2019-02-11 10:00:15: Auto-start of EM agents enabled
  (*) 2019-02-11 10:00:30: EM agent in /u01/app/oracle/product/Agent12c/core/12.1.0.4.0 started
  (*) 2019-02-11 10:00:53: EM agent in /opt/OracleHomes/agent_home/core/12.1.0.4.0 started
  (*) 2019-02-11 10:00:53: Purging any extra jdk packages.
  (*) 2019-02-11 10:00:53: No jdk package cleanup needed. Retained jdk package installed: jdk1.8-1.8.0_191.x86_64
  (*) 2019-02-11 10:00:54: Retained the required kernel-transition package: kernel-transition-2.6.32-0.0.0.3.el6
  (*) 2019-02-11 10:01:07: Capturing service status and file attributes. This may take a while...
  (*) 2019-02-11 10:01:07: Service status and file attribute report in: /etc/exadata/reports
  (*) 2019-02-11 10:01:08: All post steps are finished.


  • Verify the compute nodes new Image version
[root@dm01db01 ~]# dcli -g dbs_group -l root 'imageinfo | grep "Image version"'
dm01db01: Image version: 18.1.12.0.0.190111
dm01db02: Image version: 18.1.12.0.0.190111
dm01db03: Image version: 18.1.12.0.0.190111
dm01db04: Image version: 18.1.12.0.0.190111


[root@dm01db01 ~]# /u01/app/11.2.0.4/grid/bin/crsctl stat res -t | more
--------------------------------------------------------------------------------
NAME           TARGET  STATE        SERVER                   STATE_DETAILS
--------------------------------------------------------------------------------
Local Resources
--------------------------------------------------------------------------------
ora.DATA_dm01.dg
               ONLINE  ONLINE       dm01db01
               ONLINE  ONLINE       dm01db02
               ONLINE  ONLINE       dm01db03
               ONLINE  ONLINE       dm01db04
ora.DBFS_DG.dg
               ONLINE  ONLINE       dm01db01
               ONLINE  ONLINE       dm01db02
               ONLINE  ONLINE       dm01db03
               ONLINE  ONLINE       dm01db04
ora.LISTENER.lsnr
               ONLINE  ONLINE       dm01db01
               ONLINE  ONLINE       dm01db02
               ONLINE  ONLINE       dm01db03
               ONLINE  ONLINE       dm01db04
ora.RECO_dm01.dg
               ONLINE  ONLINE       dm01db01
               ONLINE  ONLINE       dm01db02
               ONLINE  ONLINE       dm01db03
               ONLINE  ONLINE       dm01db04
ora.asm
               ONLINE  ONLINE       dm01db01                 Started
               ONLINE  ONLINE       dm01db02                 Started
               ONLINE  ONLINE       dm01db03                 Started
               ONLINE  ONLINE       dm01db04                 Started
ora.gsd
               OFFLINE OFFLINE      dm01db01
               OFFLINE OFFLINE      dm01db02
               OFFLINE OFFLINE      dm01db03
               OFFLINE OFFLINE      dm01db04
ora.net1.network
               ONLINE  ONLINE       dm01db01
               ONLINE  ONLINE       dm01db02
               ONLINE  ONLINE       dm01db03
               ONLINE  ONLINE       dm01db04
ora.ons
               ONLINE  ONLINE       dm01db01
               ONLINE  ONLINE       dm01db02
               ONLINE  ONLINE       dm01db03
               ONLINE  ONLINE       dm01db04
ora.registry.acfs
               ONLINE  OFFLINE      dm01db01
               ONLINE  OFFLINE      dm01db02
               ONLINE  OFFLINE      dm01db03
               ONLINE  OFFLINE      dm01db04
--------------------------------------------------------------------------------
Cluster Resources
--------------------------------------------------------------------------------
ora.LISTENER_SCAN1.lsnr
      1        ONLINE  ONLINE       dm01db02
ora.LISTENER_SCAN2.lsnr
      1        ONLINE  ONLINE       dm01db04
ora.LISTENER_SCAN3.lsnr
      1        ONLINE  ONLINE       dm01db03
ora.cvu
      1        ONLINE  ONLINE       dm01db03
ora.dbm01.db
      1        OFFLINE OFFLINE
      2        OFFLINE OFFLINE
      3        OFFLINE OFFLINE
      4        OFFLINE OFFLINE
ora.dm01db01.vip
      1        ONLINE  ONLINE       dm01db01
ora.dm01db02.vip
      1        ONLINE  ONLINE       dm01db02
ora.dm01db03.vip
      1        ONLINE  ONLINE       dm01db03
ora.dm01db04.vip
      1        ONLINE  ONLINE       dm01db04
ora.oc4j
      1        ONLINE  ONLINE       dm01db03
ora.orcldb.db
      1        ONLINE  ONLINE       dm01db01                 Open
      2        ONLINE  ONLINE       dm01db02                 Open
      3        ONLINE  ONLINE       dm01db03                 Open
      4        ONLINE  ONLINE       dm01db04                 Open
ora.scan1.vip
      1        ONLINE  ONLINE       dm01db02
ora.scan2.vip
      1        ONLINE  ONLINE       dm01db04
ora.scan3.vip
      1        ONLINE  ONLINE       dm01db03


Conclusion

In this article we have learned how to perform upgrade Exadata Compute nodes using patchmgr & dbnodeupdate.sh utilities. The patchmgr utility can be used for upgrading, rollback and backup Exadata Compute nodes. patchmgr utility can be used for upgrading Exadata Compute nodes in a rolling or non-rolling fashion. Launch patchmgr from the compute node that is node 1 that has user equivalence setup to all the Compute nodes. Patch all the compute nodes except node 1 and later patch node 1 alone.


Comparing Oracle Database Appliance X8-2 Model Family

September 2019 Oracle announced Oracle Database Appliance X8-2 (Small, Medium and HA). ODA X8-2 comes with more computing resources com...