Showing posts with label PaaS. Show all posts

Tuesday, 22 January 2019

Oracle DBCS : Create A Database Deployment With Automatic Backup

When creating a new database deployment on Oracle Database Cloud Service, you have option to choose whether you want to configure automatic backup or not. The options are as follows:
  • Both Cloud Storage and Local Storage
30 days worth of backups are kept and the 7 most recent days worth available directly on the compute node’s local storage. 
  • Cloud Storage Only
30 days worth of backups are kept with all backups on cloud storage container.
  • None
No automatic Backup are configured

In this article we will demonstrate how to Create A Database Deployment with Automatic Backup configured using Create Service Wizard.


Prerequisites:
  • Oracle Account
  • Oracle Cloud Subscription
  • SSH Public/Private Key pair
  • Oracle Storage REST Endpoint

Steps to Create a Database Deployment

  • Open a web browser and enter the URL you received in the Welcome email to login to Oracle Cloud Account

  • Enter your username and password

  • Get the REST Endpoint by connecting to Container Classic. This REST Endpoint will be used when creating the Database Deployment.


  • Open the Service Console from the Database Server as show below

  • Click on "Create Service"

  • Fill in all the details and click Next
    • Service Name: Enter the service name, It only accepts hyphen (-) as special character
    • Description (optional): Enter a description on the service
    • Notification Email: To send the update on Instance creation
    • Service level: Oracle Database Cloud Service
    • Metering Frequency: Monthly or Hourly
    • Software Release: 11gR2, 12cR1 or 12cR2
    • Software Edition: Enterprise, standard, Enterprise Edition - Extreme performance or Enterprise Edition - High performance
    • Database Type: Single Instance, Single Instance with Data Guard, RAC, RAC with Data Guard, Hybrid DR
Once the information is filled, Click Next.

  • Fill in all the details 
    • DB Name: This will be your container DB name
    • PDB Name: This will be your pluggable DB name
    • Administrator password: This will be your administrator password for users sys, system, dbaas_monitor and so on
    • Backup and Recovery Configuration: Cloud and Local, Cloud only or None
    • Compute Shape: select the configuration you need for your business
    • SSH Public Key: choose the public key you generated in steps
Once the information is filled, Click Next.

  • Review the Summary and click "Create"

  • At this moment the Service creation is in progress. Click on the Service Name

  • This page shows that the provisioning is in-progress. Click on Oracle Database Cloud Services to go back to the home page

  • The service has been created successfully


  • Up on the completion you will also receive the email that the service is created and is now available for use

  • Connect to the Compute node and verify the database.


Conclusion

In this article we have learned how to create a database deployment and configure automatic backups in Oracle Database Cloud Service.

Saturday, 17 March 2018

Oracle DBCS : Create Virtual Image Database Deployment - Part 4


In previous articles Oracle DBCS: Create Virtual Image Database Deployment series we have learned how to:

Oracle DBCS : Create Virtual Image Database Deployment - Part 1
https://netsoftmate.blogspot.in/2018/02/oracle-dbcs-create-virtual-image-database-deployment.html

Oracle DBCS : Create Virtual Image Database Deployment - Part 2
https://netsoftmate.blogspot.in/2018/03/oracle-dbcs-create-virtual-image-database-deployment-part2.html

Oracle DBCS : Create Virtual Image Database Deployment - Part 3
https://netsoftmate.blogspot.in/2018/03/oracle-dbcs-create-virtual-image-database-deployment-part3.html

In this article we will learn the final step on how to Create a Database in Virtual Image Database Deployment.

Prerequisites

  • Create Virtual Image Database Deployment
  • Create Storage Volumes for Oracle Database Software and Database Files
  • Install Oracle Database Software

Step to Create a Database in Virtual Image Database Deployment:

  • Get the IP address of the Compute node you want to connect from Oracle Database Cloud Service Console. Here my Deployment Service Name is "NSM-DBaaS-VM" and the IP address is 144.21.72.128

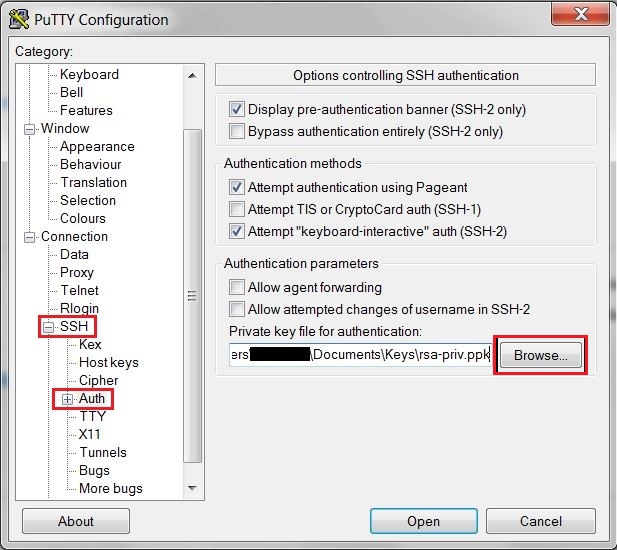
  • On the left pane, expand "SSH" and select "Auth". On the right pane, click on "Browse" button. Select the Private Key that matches the Public Key for your Deployment. Click "Open"

  • Enter login as "opc" user. You will be connected without prompting for the password. Switch to the "root" user and "oracle user". Verify no database is running currently.

  • Login as oracle user and set Oracle Home, Oracle Base and PATH variable. Make sure Oracle Executable dbca is set in PATH correctly.

  • Start dbca in silent mode by providing the values on the command line as shown below:

  • Connect to the database and verify the status


Conclusion

In this article we have learned how to create a database in Virtual Image Database Deployment.

Oracle DBCS : Create Virtual Image Database Deployment - Part 3


In previous articles we have learned how to create Virtual Image deployment and Scale Up Storage Using Oracle Database Cloud Service and Create one storage volume for the Oracle Database software and one storage volume for all database files, and prepare them for use. 

Oracle DBCS : Create Virtual Image Database Deployment - Part 1
https://netsoftmate.blogspot.in/2018/02/oracle-dbcs-create-virtual-image-database-deployment.html

Oracle DBCS : Create Virtual Image Database Deployment - Part 2


https://netsoftmate.blogspot.in/2018/03/oracle-dbcs-create-virtual-image-database-deployment-part2.html

In this article we will learn how to Install Oracle Database Software

Prerequisites

  • Create Virtual Image Database Deployment
  • Create Storage Volumes for Oracle Database Software and Database Files

Steps to Install Oracle Database Software in Virtual Image Database Deployment.

  • Get the IP address of the Compute node you want to connect from Oracle Database Cloud Service Console. Here my Deployment Service Name is "NSM-DBaaS-VM" and the IP address is 144.21.72.128

  • On the left pane, expand "SSH" and select "Auth". On the right pane, click on "Browse" button. Select the Private Key that matches the Public Key for your Deployment. Click "Open"

  • Enter login as "opc" user. You will be connected without prompting for the password. Switch to the "root" user and "oracle user"

  • Login as oracle user, switch directory to /u01 and look for the zip file containing the Oracle Database software by displaying the contents of the /scratch/db directory. Extract the zip file into the current directory /u01

  • Ensure that the Oracle software is extracted correctly

  • Switch to root user and execute the set-up scripts as follows. Exit the session


Conclusion


In this article we have learned how to Install Oracle Database Software on a Virtual Image Database Deployment. Installing Oracle Software in VM Image deployment is very easy, you just need to locate the correct Oracle Software version and extract them in the correct directory.

Oracle DBCS : Create Virtual Image Database Deployment - Part 2

In previous article "Oracle DBCS : Create Virtual Image Database Deployment - Part 1" we have learned how to Create Virtual Image Database Deployment using Create Service Wizard.
https://netsoftmate.blogspot.in/2018/02/oracle-dbcs-create-virtual-image-database-deployment.html

In this article we will Scale Up Storage Using Oracle Database Cloud Service and Create one storage volume for the Oracle Database software and one storage volume for all database files, and prepare them for use. This will be the part 2 and continuation of the previous article.


Prerequisites
Create Virtual Image Database Deployment


Steps to Scale up Storage using Oracle Database Cloud Service Console in Virtual Image Database Deployment.


  • Open a web browser and enter the URL you received in the Welcome email to login to Oracle Cloud Account
https://myservices-xxxxx-xxxxxxxxxxef4b21bb7ee3b2cf4123d1.console.oraclecloud.com/mycloud/faces/dashboard.jspx


  • Enter your username and password


  • On the home page, Click "Menu" under "Database" Cloud Service as shown below


  • Click "Open Service Console"


  • Currently the Storage is 32GB. Let's Scale Up the Storage. Click on the Instance Name


  • Click on the "Menu" icon and Select "Scale Up/Down"

  • I am adding addition 30GB storage. Click "Yes, Scale Up/Down Service"Here I am adding addition 30GB storage. Click "Yes, Scale Up/Down Service"


  • A message printed on the screen "Service scale up/down request is accepted". The Instance status changed to "Service Maintenance"


  • After sometime we can see that the Storage is now Scale up to 62GB. Click on Instance to add more Storage


  • Click on the "Menu" icon and Select "Scale Up/Down"


  • This time I am adding addition 50GB storage. Click "Yes, Scale Up/Down Service"


  • A message printed on the screen "Service scale up/down request is accepted". The Instance status changed to "Service Maintenance"


  • After sometime we can see that the Storage is now Scale up to 112GB.


  • Get the IP address of the Compute node you want to connect from Oracle Database Cloud Service Console. Here my Deployment Service Name is "NSM-DBaaS-VM" and the IP address is 144.21.72.128


  • On the left pane, expand "SSH" and select "Auth". On the right pane, click on "Browse" button. Select the Private Key that matches the Public Key for your Deployment. Click "Open"


  • Enter login as "opc" user. You will be connected without prompting for the password. Switch to the "root" user


  • Display the list of block devices, the two volumes created are xvdc and xvdd


  • First format the volume for the Oracle Database software and mount it as /u01 as shown below


  • Now format the volume for the database files, and mount it as /u02 as shown below


  • Verify the mount points and display the block devices


  • Update the /etc/fstab file so new mount points get mounted automatically whenever the VM is rebooted


Conclusion

In this article we have learned how to Scale Up Storage using Oracle Database Cloud Service console and create storage volumes for Oracle Database Software and Database files.

Comparing Oracle Database Appliance X8-2 Model Family

September 2019 Oracle announced Oracle Database Appliance X8-2 (Small, Medium and HA). ODA X8-2 comes with more computing resources com...